Quote3D Widget & API Integration Guide: From 3D File Upload to Automated Checkout
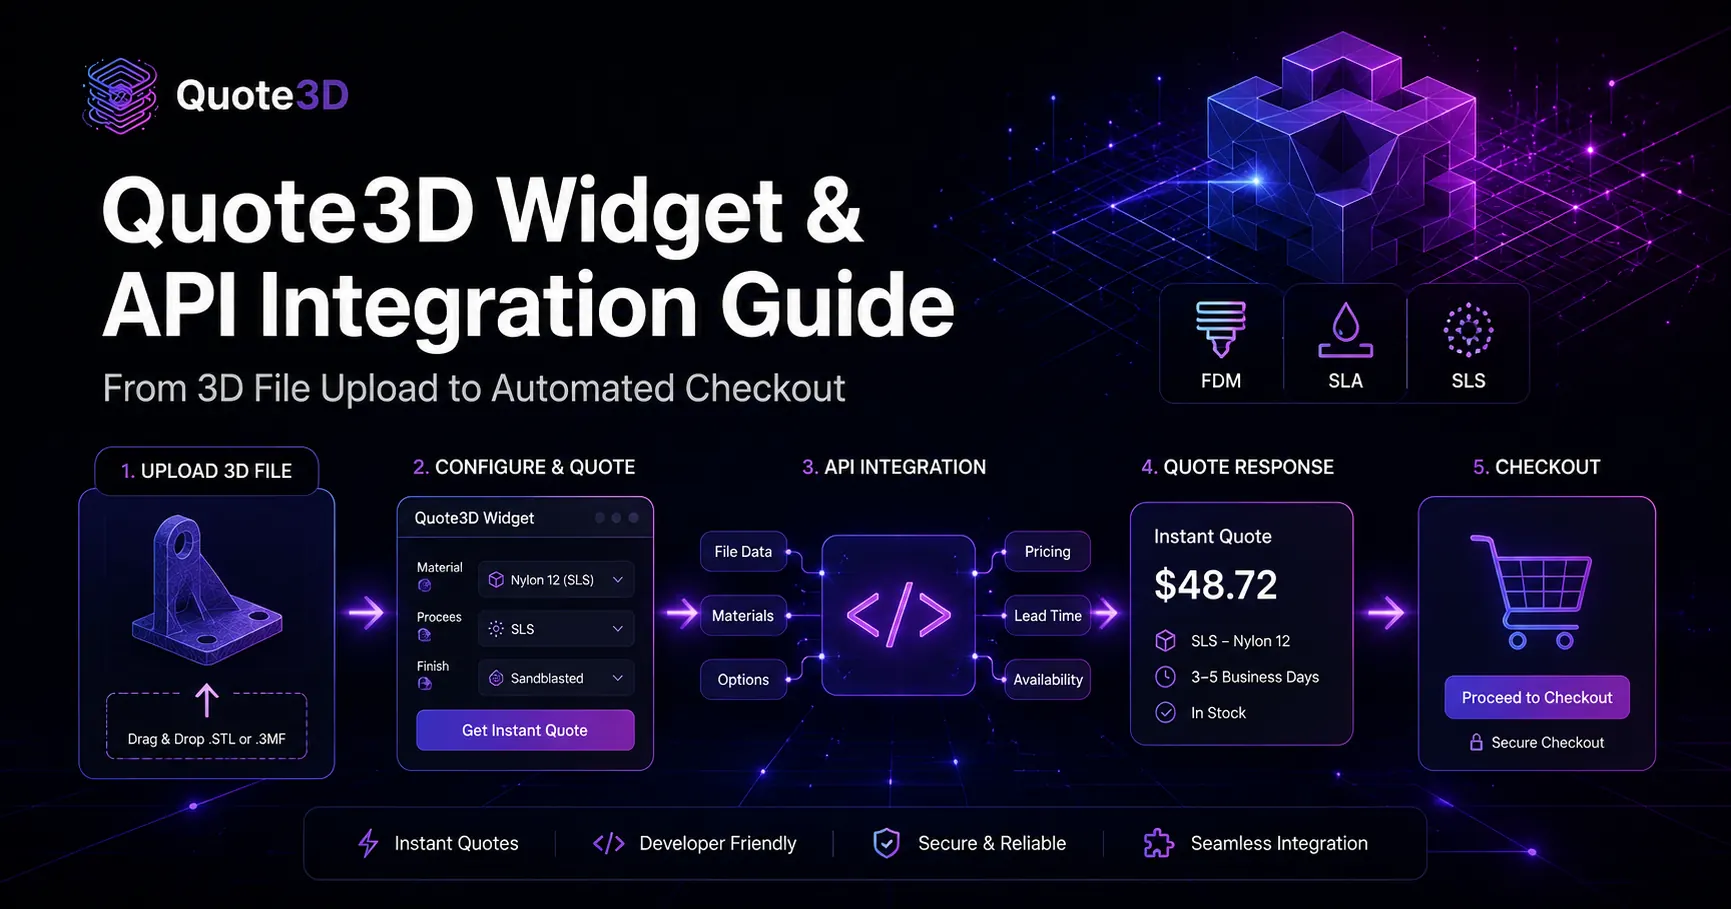
Introduction: What You’ll Build
Manual 3D printing quoting slows down every part of the sales process. A customer uploads a file, someone checks dimensions, estimates material usage, calculates print time, applies margins, replies by email, and then waits for confirmation. That workflow works when order volume is low, but it becomes a bottleneck as soon as your business starts receiving more models, more materials, and more urgent requests.
Quote3D is built to remove that bottleneck. It gives 3D printing businesses a REST API and an embeddable widget for automated model analysis, async quote generation, printability checks, and production-ready quoting workflows. It supports common 3D model formats such as STL, 3MF, and OBJ, and includes technology-specific quote logic for FDM, SLA, and SLS workflows.
By the end of this guide, you will understand how to:
Embed the Quote3D Widget on your website or eCommerce product page.
Authenticate with the Quote3D API.
Upload 3D model files securely.
Start an async quote job and retrieve the result.
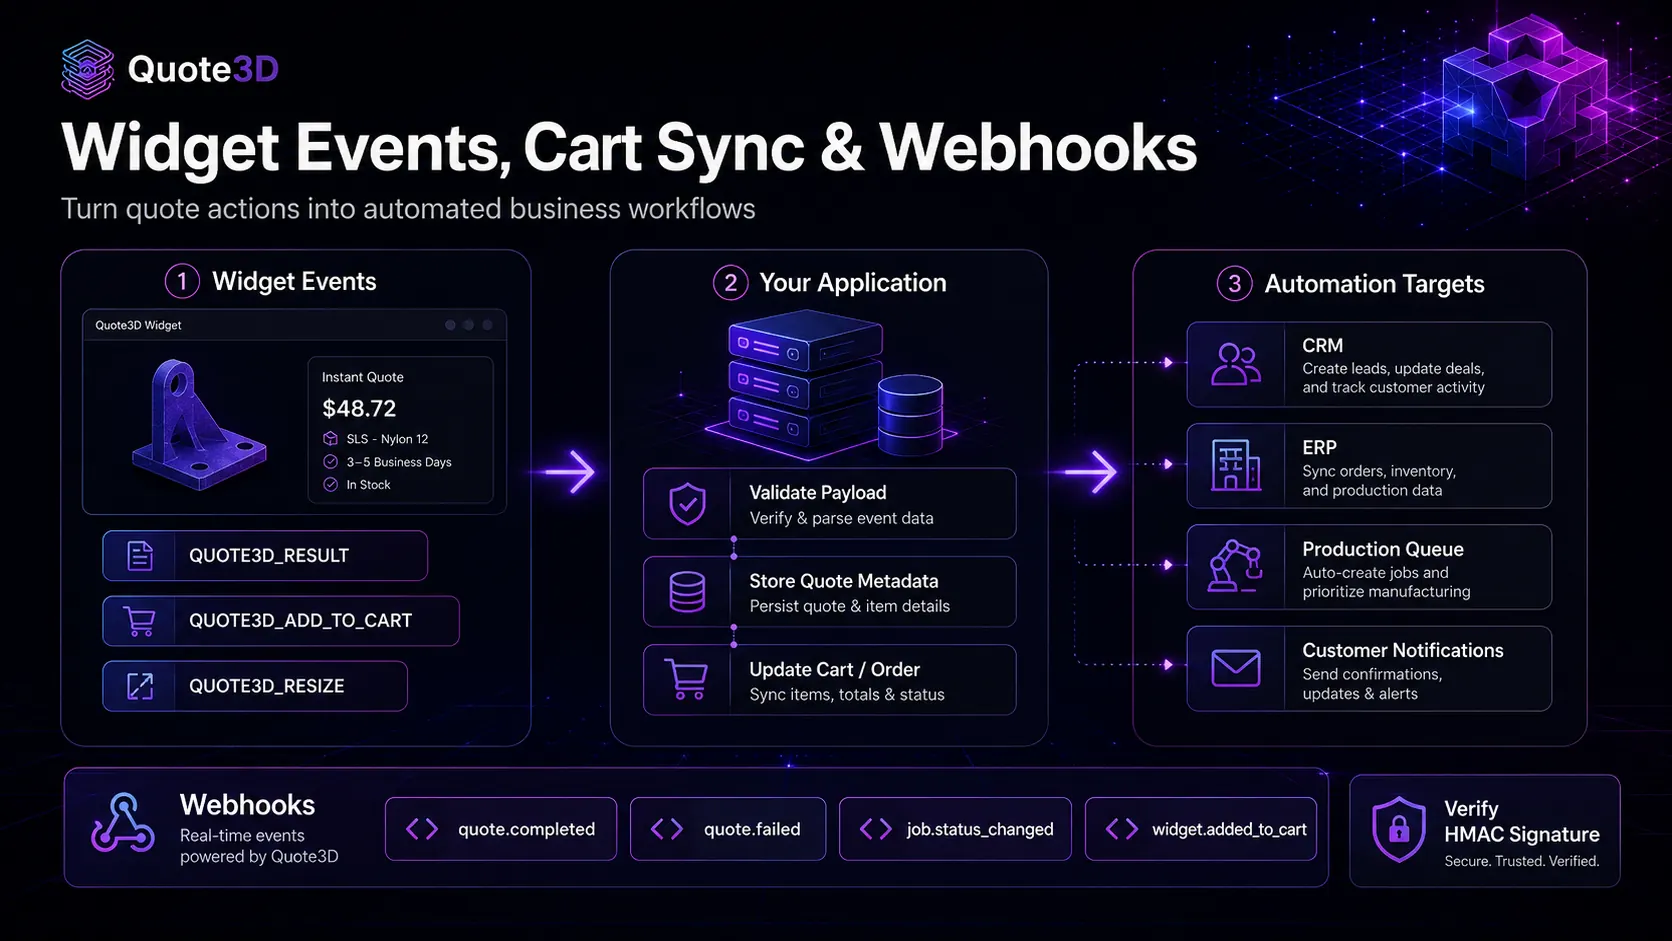
Listen for widget events such as quote completion, add-to-cart, and resize.
Sync calculated prices and technical quote data with your cart or backend.
Use webhooks to automate downstream workflows such as CRM updates, customer notifications, or production job creation.
Avoid the most common integration mistakes in production.
This is not just a widget overview. It is a practical integration blueprint for turning a 3D model upload into an automated quote and, when needed, a purchasable cart item.
1. What Is the Quote3D Widget?
The Quote3D Widget is an embeddable quoting interface that lets customers upload a 3D model, preview it, choose manufacturing options, receive a calculated price, and continue into your order flow without leaving your website.
The widget is useful when you want a fast, customer-facing quoting experience without building your own 3D viewer, upload form, material selector, printer selector, and pricing UI from scratch. According to the widget documentation, it includes an interactive model viewer, instant pricing based on your material and printer profiles, FDM/SLA/SLS support, custom themes, platform plugin options, and eCommerce sync capabilities.
Typical use cases include:
A 3D printing service adding instant quoting to its website.
A WooCommerce or Shopify store selling custom printed parts.
A print farm that wants to capture quote requests automatically.
A custom React, Vue, or Vanilla JavaScript app that needs a quoting flow.
A manufacturing portal where customers upload parts and receive production-ready estimates.
2. Widget vs Direct API: Which Integration Should You Choose?
Quote3D supports two main integration styles: the embeddable widget and the REST API. In many real projects, you will use both.
Use CaseRecommended ApproachYou want the fastest customer-facing quote formUse the WidgetYou use WordPress, Shopify, WooCommerce, Wix, Squarespace, PrestaShop, or OpenCartStart with Widget or platform snippetsYou need a fully custom UIUse the API directlyYou need internal automation for a print farmUse the API and webhooksYou want quote results to update your cartUse Widget events plus your backendYou want to store quotes, analyze usage, or trigger ERP/CRM workflowsUse API endpoints and webhooks
The widget documentation states that Quote3D can be embedded into popular platforms and custom software, while custom React, Vue, or Vanilla JS projects can integrate through the JS SDK.
A simple rule:
Use the Widget for the customer interface. Use the API for backend control. Use webhooks for production automation.
3. The Quote3D Integration Architecture
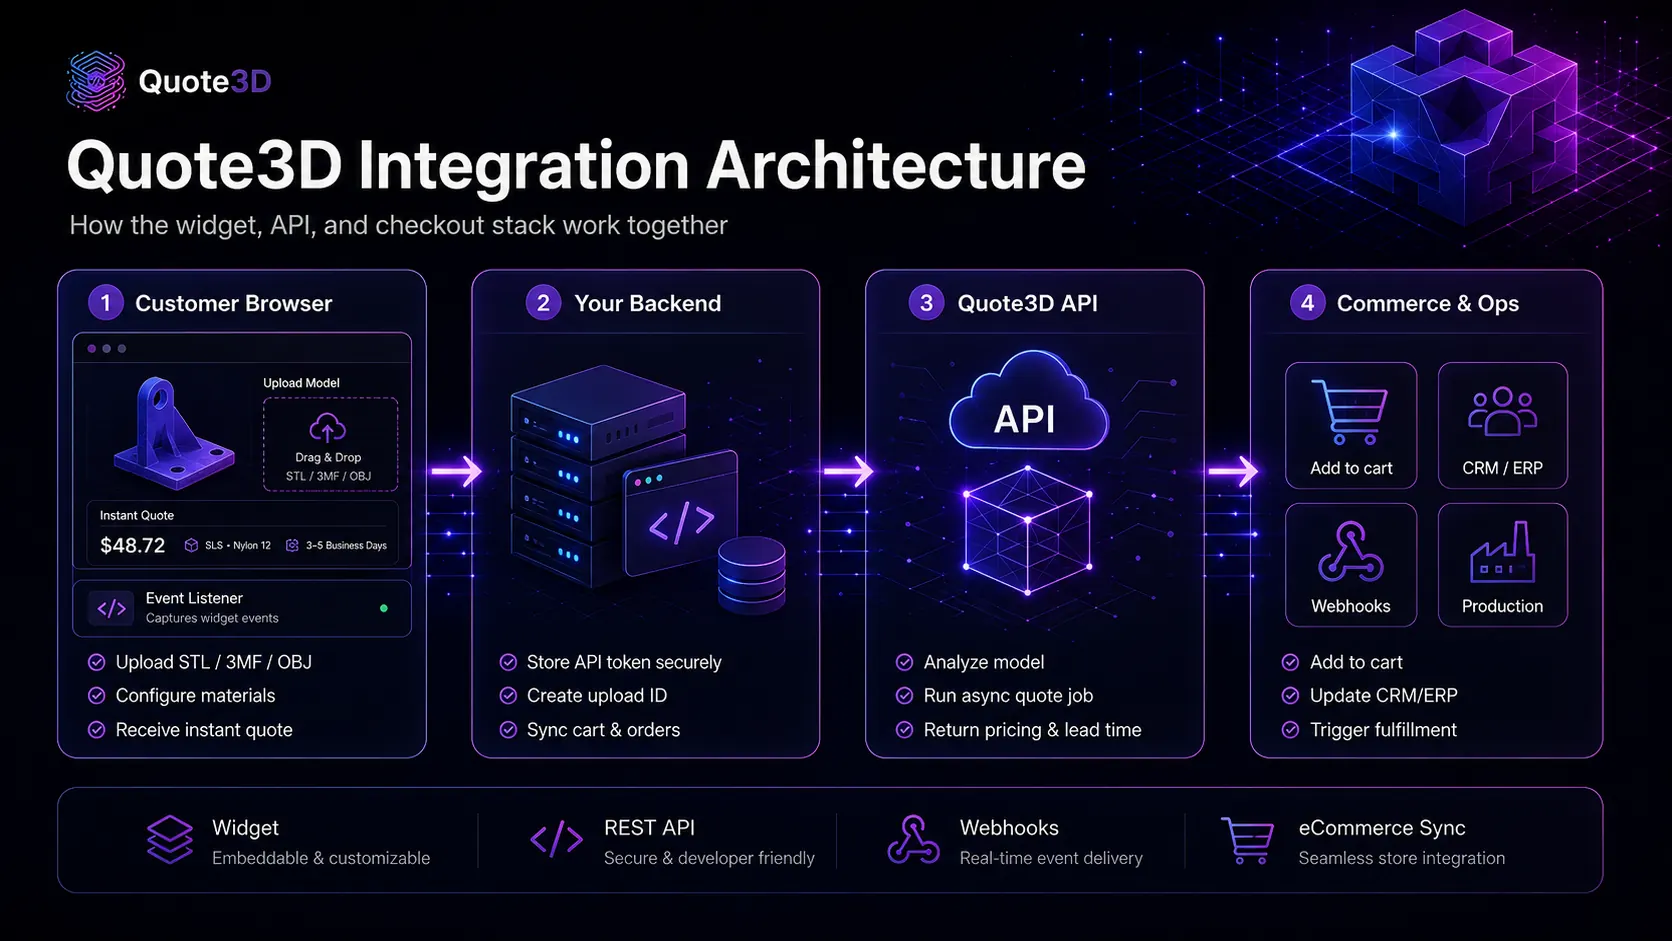
A production-ready integration usually has four parts:
Customer Browser
  ├─ Quote3D Widget or custom upload UI
  ├─ Receives widget messages: quote result, add-to-cart, resize
  └─ Sends cart actions to your backend

Your Backend
  ├─ Stores API token securely
  ├─ Creates upload IDs or uploads files server-side
  ├─ Starts quote jobs
  ├─ Polls job status when needed
  ├─ Syncs quote data with cart, CRM, ERP, or order database
  └─ Verifies webhooks

Quote3D API
  ├─ File upload
  ├─ Printability check
  ├─ Async quote jobs
  ├─ Quote history
  ├─ Widget add-to-cart event storage
  └─ Analytics

Your Commerce / Operations Stack
  ├─ WooCommerce, Shopify, custom checkout, ERP, CRM, MES, or print queue
  └─ Receives final price, material, technology, quantity, file name, quote ID, and technical metadata
The key idea is separation of responsibility:
The browser handles the user experience.
Your backend protects secrets and controls business logic.
Quote3D handles 3D model analysis and quote calculation.
Your store or ERP handles checkout and fulfillment.
4. Before You Start: Dashboard Setup
Before writing integration code, configure the basics in the Quote3D dashboard.
Create an API token
Quote3D API endpoints require authentication using an API token. The documentation explains that external API calls can send the token either through an Authorization: Bearer header or an X-API-Token header.
Use this pattern for server-side calls:
curl -X GET "https://api.quote3d.com/v2/user" \
  -H "Authorization: Bearer YOUR_TOKEN_HERE" \
  -H "Content-Type: application/json"
Important token rules:
Store your backend API token in environment variables.
Never commit tokens to source control.
Do not confuse a token ID shown in a dashboard list with the actual token value.
Copy the token when it is created and store it securely.
Use a dedicated token for widget or integration usage when possible.
Rotate tokens regularly.
The widget documentation specifically warns that widget API calls require a real API Bearer token, not a token ID.
Configure printer, material, and quote profiles
Quote3D can use default profiles from your dashboard, which keeps API requests short. You can define printer profiles, material profiles, and quote/global settings in the dashboard, then override only the fields you need in specific quote requests. The Core Concepts page explains that request parameters take priority, then user profile values, then global defaults.
Recommended dashboard setup:
Create printer profiles for each real machine.
Define material profiles such as PLA, ABS, PETG, PA12, or resin materials.
Set material prices per kilogram or gram.
Configure default currency, fixed fees, tax rate, energy cost, and margin logic.
Set your default slice profile so minimal API quote requests still produce consistent results.
5. Fast Path: Embed the Widget
The quickest way to start is to generate the widget embed code from your Quote3D dashboard and place it on the relevant page.
Use this structure as a safe implementation pattern:
<div class="quote3d-widget-wrapper">
  <!-- Paste the iframe URL generated by Quote3D Dashboard > Widget Settings -->
  <iframe
    id="quote3d-widget"
    src="QUOTE3D_WIDGET_EMBED_URL_FROM_DASHBOARD"
    width="100%"
    height="760"
    style="border:0; width:100%;"
    loading="lazy"
    allow="clipboard-write"
  ></iframe>
</div>
Iframe mode is usually best when:
You want the fastest launch.
You are embedding into a CMS or page builder.
You want CSS and JavaScript isolation.
You do not need deep control over every UI state.
The widget documentation describes iframe operation as isolated, so the widget does not break the host website’s styling. It also describes real-time communication through postMessage.
6. Advanced Path: Use the JavaScript SDK
For custom applications, the SDK gives more control over event handling, layout behavior, and custom checkout logic.
The Quote3D LLM integration guide documents this SDK initialization pattern:
Quote3D.init('#root', {
  token,
  theme,
  color,
  locale,
  redirectUrl,
  quoteId,
  onResult,
  onAddToCart
});
It also notes that the widget posts messages such as QUOTE3D_RESULT, QUOTE3D_ADD_TO_CART, and QUOTE3D_RESIZE to the host page.
A practical SDK implementation might look like this:
<div id="quote3d-root"></div>

<script src="QUOTE3D_SDK_SCRIPT_URL_FROM_DASHBOARD"></script>
<script>
  Quote3D.init('#quote3d-root', {
    token: 'YOUR_WIDGET_TOKEN',
    theme: 'light',
    color: '#111827',
    locale: 'en',
    redirectUrl: 'https://your-store.com/cart',

    onResult(result) {
      console.log('Quote completed:', result);

      // Example: update a summary sidebar
      document.querySelector('#quote-total').textContent =
        `${result.totalPrice} ${result.currency}`;
    },

    async onAddToCart(payload) {
      console.log('Add to cart requested:', payload);

      await fetch('/api/cart/quote3d', {
        method: 'POST',
        headers: { 'Content-Type': 'application/json' },
        body: JSON.stringify(payload)
      });

      window.location.href = '/cart';
    }
  });
</script>
The SDK path is best when:
You have a custom frontend.
You want to update sidebars, product configurators, or live summaries.
You need custom add-to-cart behavior.
You want tighter control over redirects and event handling.
7. Listen for Widget postMessage Events
Even when using iframe mode, your host page can listen for messages from the widget.
A safe listener should:
Validate the message origin.
Check the message type.
Handle resize events.
Persist quote result metadata.
Send add-to-cart events to your backend.
const allowedQuote3DOrigins = new Set([
  'https://www.quote3d.com',
  'https://quote3d.com'
]);

const iframe = document.getElementById('quote3d-widget');

window.addEventListener('message', async (event) => {
  if (!allowedQuote3DOrigins.has(event.origin)) return;

  const message = event.data || {};
  const { type, payload } = message;

  if (type === 'QUOTE3D_RESIZE' && payload?.height && iframe) {
    iframe.style.height = `${payload.height}px`;
    return;
  }

  if (type === 'QUOTE3D_RESULT') {
    console.log('Quote result:', payload);

    // Store useful quote fields for your UI or analytics
    sessionStorage.setItem('quote3d:lastQuote', JSON.stringify(payload));
    return;
  }

  if (type === 'QUOTE3D_ADD_TO_CART') {
    const response = await fetch('/api/cart/quote3d', {
      method: 'POST',
      headers: { 'Content-Type': 'application/json' },
      body: JSON.stringify(payload)
    });

    if (!response.ok) {
      console.error('Cart sync failed');
      return;
    }

    window.location.href = '/cart';
  }
});
Expected payload fields may include values such as quoteId, totalPrice, currency, material, technology, quantity, thumbnailUrl, fileName, weight, and filamentWeight. The LLM integration guide recommends preserving both weight and filamentWeight for compatibility.
8. Sync Widget Quotes to Your Cart
When a customer clicks “Add to Cart,” your backend should receive the widget payload, validate it, record it, and then update your store cart.
Quote3D provides POST /v2/widget/add-to-cart for widget handoff workflows. The documentation describes it as the endpoint used to record the conversion event, store the quote/cart relationship, and trigger widget.added_to_cart webhook automation when needed.
Example backend bridge using Node.js and Express:
import express from 'express';

const app = express();
app.use(express.json());

const Q3D_API_BASE = 'https://api.quote3d.com/v2';

app.post('/api/cart/quote3d', async (req, res) => {
  try {
    const quotePayload = req.body;

    if (!quotePayload?.quoteId || !quotePayload?.totalPrice) {
      return res.status(400).json({
        error: 'Missing quoteId or totalPrice'
      });
    }

    // 1. Record the canonical widget add-to-cart event in Quote3D
    const quote3dResponse = await fetch(`${Q3D_API_BASE}/widget/add-to-cart`, {
      method: 'POST',
      headers: {
        'Authorization': `Bearer ${process.env.QUOTE3D_API_TOKEN}`,
        'Content-Type': 'application/json'
      },
      body: JSON.stringify({
        quoteId: quotePayload.quoteId,
        totalPrice: quotePayload.totalPrice,
        currency: quotePayload.currency,
        material: quotePayload.material,
        technology: quotePayload.technology,
        quantity: quotePayload.quantity,
        thumbnailUrl: quotePayload.thumbnailUrl,
        fileName: quotePayload.fileName,
        weight: quotePayload.weight ?? quotePayload.filamentWeight,
        metadata: quotePayload
      })
    });

    if (!quote3dResponse.ok) {
      const errorText = await quote3dResponse.text();
      return res.status(502).json({
        error: 'Quote3D add-to-cart sync failed',
        details: errorText
      });
    }

    // 2. Add the item to your own cart/order system
    // Replace this with WooCommerce, Shopify, custom DB, ERP, or checkout logic.
    const cartItem = {
      productType: 'custom_3d_print',
      quoteId: quotePayload.quoteId,
      price: quotePayload.totalPrice,
      currency: quotePayload.currency,
      quantity: quotePayload.quantity || 1,
      metadata: quotePayload
    };

    return res.json({
      success: true,
      cartItem
    });
  } catch (error) {
    console.error('Cart bridge error:', error);
    return res.status(500).json({
      error: 'Internal cart sync error'
    });
  }
});
For open cart systems, you can often create a custom line item with the calculated price. For closed systems, the widget documentation recommends platform-specific strategies such as using a 1-unit product and quantity-based pricing or using the platform API to override the final cart price. WooCommerce is described as supporting automatic price updates through the ready plugin, while Shopify and similar closed systems may require a price override strategy.
9. Persist Model Thumbnails
If your workflow needs a visual reference in the cart, admin panel, production queue, or customer order confirmation, persist the model preview.
Quote3D provides POST /v2/thumbnail/save to store preview images generated on the client side. The documentation says the endpoint can save a base64 model screenshot and return a saved thumbnail URL that can be attached to cart items, order metadata, or manufacturing workflows.
Example use cases:
Show the uploaded part thumbnail in the shopping cart.
Attach a preview to the production job.
Display the model image in the customer’s order history.
Include the thumbnail in internal approval workflows.
10. Direct API Integration: Upload → Quote → Result
The widget is the fastest customer-facing option, but direct API integration is better when you want to build your own UI or automate internal workflows.
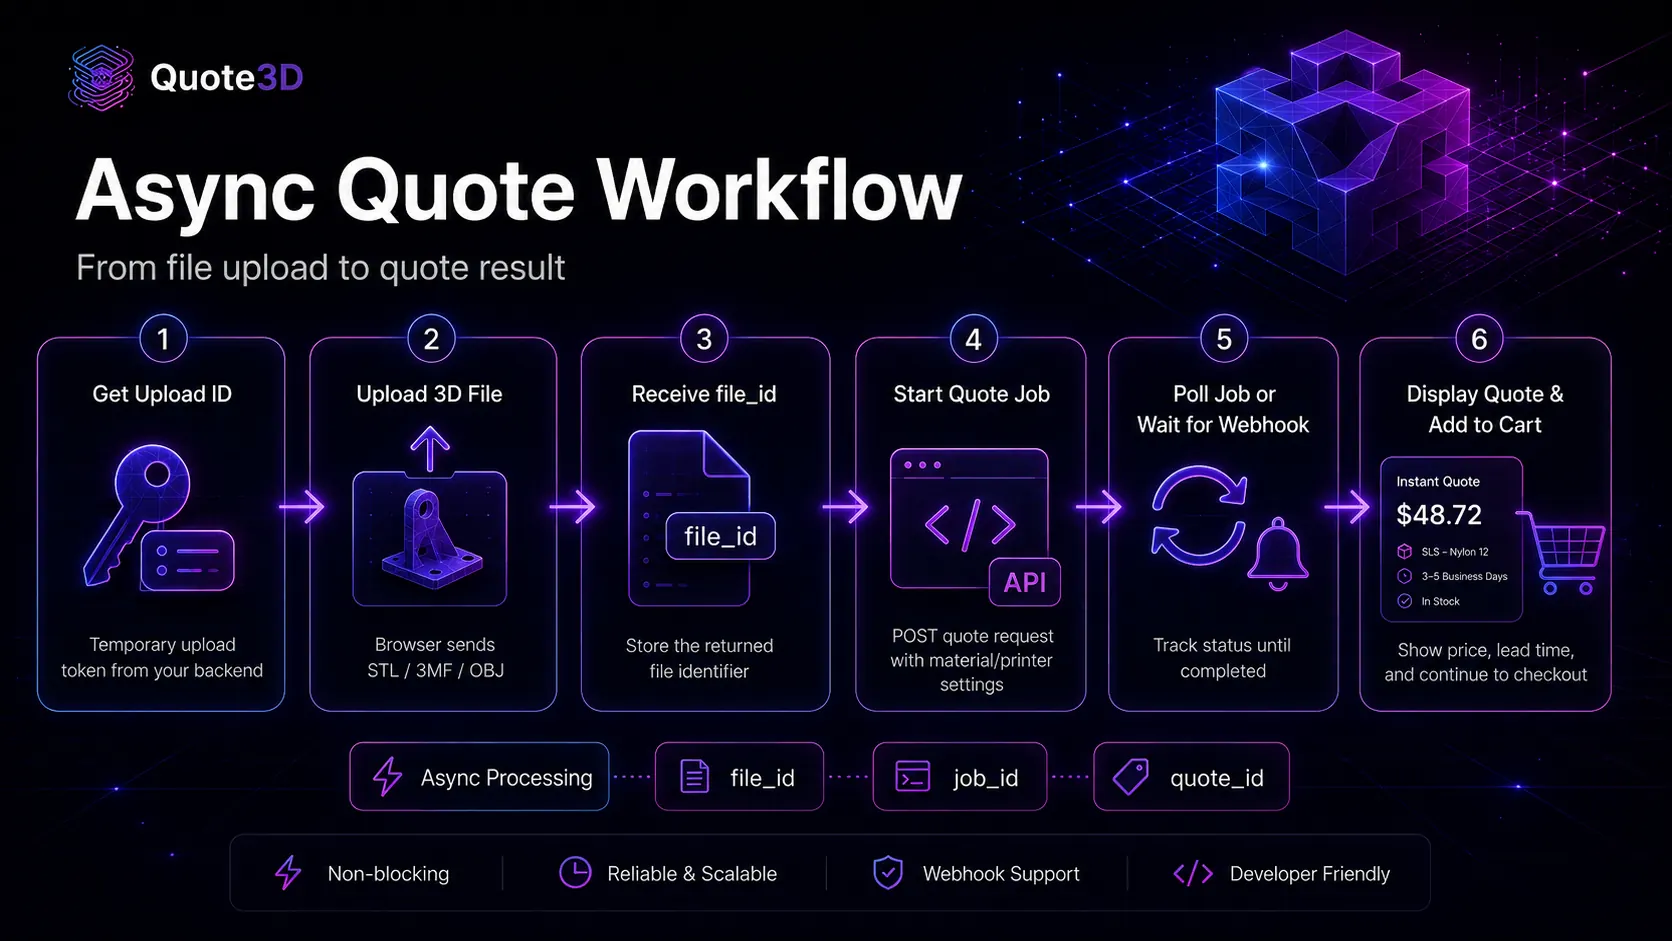
The core API flow is:
1. Authenticate with API token
2. Upload a 3D file
3. Get a file_id
4. Optionally run printability analysis
5. Start an async quote job
6. Poll the job endpoint or wait for a webhook
7. Store or display the completed quote result
The Core Concepts documentation lists the main file, printability, quote, job, quote history, webhook, analytics, and quota endpoints. It also explains that quote requests return a job ID and that GET /v2/jobs/{job_id} is used to retrieve status and the completed result.
Public upload flow
For browser-based upload flows, use the public upload route so large files do not pass through your backend and your API token is not exposed in the browser.
The documentation explains this two-step pattern:
Your backend gets anupload_id.
The browser uploads the file to the public upload route without authentication.
Frontend example:
async function uploadModelWithPublicRoute(file) {
  // Step 1: Ask your backend for a temporary upload_id
  const uploadIdResponse = await fetch('/api/quote3d/upload-id');
  if (!uploadIdResponse.ok) {
    throw new Error('Could not create upload ID');
  }

  const uploadIdData = await uploadIdResponse.json();
  const uploadId = uploadIdData.upload_id;

  // Step 2: Upload directly to Quote3D public upload route
  const formData = new FormData();
  formData.append('file', file);

  const uploadResponse = await fetch(
    `https://api.quote3d.com/v2/file/public/${uploadId}`,
    {
      method: 'POST',
      body: formData
    }
  );

  if (!uploadResponse.ok) {
    throw new Error('File upload failed');
  }

  const uploadResult = await uploadResponse.json();

  const fileId =
    uploadResult.file_id ||
    uploadResult.data?.file_id ||
    uploadResult.data?.fileId;

  if (!fileId) {
    throw new Error('Upload succeeded but no file_id was returned');
  }

  return fileId;
}
Backend route for generating the upload ID:
app.get('/api/quote3d/upload-id', async (req, res) => {
  try {
    const response = await fetch('https://api.quote3d.com/v2/file/upload-id', {
      method: 'GET',
      headers: {
        'Authorization': `Bearer ${process.env.QUOTE3D_API_TOKEN}`
      }
    });

    if (!response.ok) {
      return res.status(502).json({
        error: 'Could not create Quote3D upload ID'
      });
    }

    const data = await response.json();
    return res.json(data.data || data);
  } catch (error) {
    console.error('Upload ID error:', error);
    return res.status(500).json({
      error: 'Internal upload ID error'
    });
  }
});
11. Start an Async Quote Job
Quote generation in Quote3D is asynchronous. The quote endpoint returns a job first; then your application polls the job endpoint until the quote is completed, failed, or cancelled. The Code Examples page explicitly notes that the quote endpoint returns HTTP 202 with a jobId and that you must poll GET /v2/jobs/{jobId} before reading the result.
Example backend quote route:
app.post('/api/quote3d/quote', async (req, res) => {
  try {
    const {
      fileId,
      printerId,
      quantity = 1,
      filamentType = 'PLA',
      color = 'White',
      currency = 'USD'
    } = req.body;

    if (!fileId) {
      return res.status(400).json({ error: 'fileId is required' });
    }

    const quoteBody = {
      quantity,
      material_config: {
        filament_type: filamentType,
        color
      },
      quote_config: {
        currency
      }
    };

    if (printerId) {
      quoteBody.printer_id = printerId;
    }

    const quoteResponse = await fetch(
      `https://api.quote3d.com/v2/file/quote/${fileId}`,
      {
        method: 'POST',
        headers: {
          'Authorization': `Bearer ${process.env.QUOTE3D_API_TOKEN}`,
          'Content-Type': 'application/json'
        },
        body: JSON.stringify(quoteBody)
      }
    );

    if (!quoteResponse.ok) {
      const errorText = await quoteResponse.text();
      return res.status(502).json({
        error: 'Quote request failed',
        details: errorText
      });
    }

    const quoteJob = await quoteResponse.json();
    return res.status(202).json(quoteJob.data || quoteJob);
  } catch (error) {
    console.error('Quote start error:', error);
    return res.status(500).json({
      error: 'Internal quote start error'
    });
  }
});
Poll the job result
async function pollQuoteJob(statusUrl, token) {
  const absoluteStatusUrl = statusUrl.startsWith('http')
    ? statusUrl
    : `https://api.quote3d.com${statusUrl}`;

  const maxAttempts = 30;

  for (let attempt = 1; attempt <= maxAttempts; attempt++) {
    const response = await fetch(absoluteStatusUrl, {
      headers: {
        'Authorization': `Bearer ${token}`
      }
    });

    if (!response.ok) {
      throw new Error(`Job polling failed with status ${response.status}`);
    }

    const body = await response.json();
    const job = body.data || body;

    if (job.status === 'completed') {
      return job.result;
    }

    if (job.status === 'failed' || job.status === 'cancelled') {
      throw new Error(job.error || `Quote job ${job.status}`);
    }

    await new Promise((resolve) => setTimeout(resolve, 2000));
  }

  throw new Error('Quote job timed out');
}
The completed job result can include values such as total price, currency, estimated print time, filament weight, quote ID, quantity, print information, support volume, time breakdown, pricing breakdown, recommendations, and processing metadata.
12. Use Printability Checks Before Quoting
Not every uploaded file is ready to print. Some models may be too large for the selected build volume, have non-manifold geometry, contain open edges, or require orientation optimization.
Quote3D provides POST /v2/printability/{file_id} for model analysis before quote generation. The documentation describes printability checks that include measurements, volume, surface area, model dimensions, printer dimensions, orientation data, support ratio, and geometric integrity fields such as open edges and non-manifold edges.
Example request:
curl -X POST "https://api.quote3d.com/v2/printability/FILE_ID_HERE" \
  -H "Authorization: Bearer YOUR_TOKEN_HERE" \
  -H "Content-Type: application/json" \
  -d '{
    "x": 210,
    "y": 210,
    "z": 250
  }'
Use printability checks when you want to:
Warn customers before they proceed.
Suggest orientation changes.
Prevent impossible orders.
Route complex files to manual review.
Show transparent technical feedback before checkout.
13. Customize Quotes with Printer, Material, and Quote Config
The simplest quote request can rely on dashboard defaults:
{
  "material_config": {
    "filament_type": "PLA",
    "color": "White"
  }
}
But for advanced use cases, you can override quote behavior per request.
Common root parameters:
{
  "printer_id": "YOUR_PRINTER_ID_HERE",
  "quantity": 2
}
Common material fields:
{
  "material_config": {
    "filament_type": "PLA",
    "color": "Black",
    "density": 1.24,
    "diameter": 1.75,
    "price_per_kg": 20.0,
    "price_per_gram": 0.02,
    "support_cost_multiplier": 1.2
  }
}
Common quote configuration fields:
{
  "quote_config": {
    "currency": "USD",
    "tax_rate": 20,
    "fixed_fee": 2.0,
    "energy_cost_per_kwh": 0.12,
    "post_processing": "standard"
  }
}
Quote3D’s Core Concepts documentation explains that missing quote parameters fall back to dashboard slice profile settings, which lets you keep requests minimal while maintaining consistent pricing.
This is especially useful when you want to:
Maintain standard shop-wide pricing rules.
Override only the material or quantity.
Use different printer profiles for different technologies.
Apply different currencies by market.
Support special post-processing options such as sanding or painting.
14. Add Webhooks for Production Automation
Polling is useful during development, but webhooks are better for production workflows.
Quote3D webhooks let your application receive real-time notifications when events happen, instead of repeatedly polling the API. The webhook documentation lists events such as quote.completed, quote.failed, quote.result_ready, file.uploaded, file.deleted, job.status_changed, and widget.added_to_cart.
Create a webhook:
curl -X POST "https://api.quote3d.com/v2/webhooks" \
  -H "Authorization: Bearer YOUR_TOKEN_HERE" \
  -H "Content-Type: application/json" \
  -d '{
    "url": "https://your-app.com/webhooks/quote3d",
    "events": [
      "quote.completed",
      "quote.failed",
      "job.status_changed",
      "widget.added_to_cart"
    ]
  }'
Use webhooks to:
Update quote status in your database.
Notify customers when a quote is ready.
Create a production job after checkout.
Push data to CRM or ERP systems.
Track widget add-to-cart conversions.
Trigger internal review for failed or risky models.
15. Verify Webhook Signatures
Do not trust incoming webhook requests until you verify their signature.
Quote3D sends an HMAC-SHA256 signature in the X-Webhook-Signature header and the event name in X-Webhook-Event. The documentation says to compute the HMAC over the raw request body using your webhook secret, prefix it with sha256=, and compare it with the received signature using a timing-safe comparison.
Example Express webhook handler:
import express from 'express';
import crypto from 'crypto';

const app = express();

app.post(
  '/webhooks/quote3d',
  express.raw({ type: 'application/json' }),
  async (req, res) => {
    const signature = req.headers['x-webhook-signature'];
    const event = req.headers['x-webhook-event'];
    const rawBody = req.body;

    if (!signature || !event || !rawBody) {
      return res.status(400).send('Missing webhook headers or body');
    }

    const expectedDigest =
      'sha256=' +
      crypto
        .createHmac('sha256', process.env.QUOTE3D_WEBHOOK_SECRET)
        .update(rawBody)
        .digest('hex');

    const receivedBuffer = Buffer.from(String(signature), 'utf8');
    const expectedBuffer = Buffer.from(expectedDigest, 'utf8');

    const valid =
      receivedBuffer.length === expectedBuffer.length &&
      crypto.timingSafeEqual(receivedBuffer, expectedBuffer);

    if (!valid) {
      return res.status(401).send('Invalid signature');
    }

    const payload = JSON.parse(rawBody.toString('utf8'));

    // Make handlers idempotent: the same event may be retried.
    switch (event) {
      case 'quote.completed':
        await handleQuoteCompleted(payload);
        break;

      case 'quote.failed':
        await handleQuoteFailed(payload);
        break;

      case 'job.status_changed':
        await handleJobStatusChanged(payload);
        break;

      case 'widget.added_to_cart':
        await handleWidgetAddedToCart(payload);
        break;

      default:
        console.log('Unhandled Quote3D event:', event);
    }

    return res.status(200).send('ok');
  }
);
Production webhook best practices:
Always verify HMAC signatures.
Use the raw request body for verification.
Return
200 OKquickly.Push slow work into a queue.
Make event handlers idempotent.
Store processed event IDs or quote IDs to avoid duplicate processing.
Log failed events for replay and debugging.
16. eCommerce Platform Notes
WooCommerce
WooCommerce is usually the most direct integration path because it supports dynamic cart behavior and custom plugins. The widget documentation notes WooCommerce compatibility through a ready PHP plugin.
Recommended WooCommerce flow:
Widget quote completed
  → Customer clicks Add to Cart
  → Host page receives QUOTE3D_ADD_TO_CART
  → Backend records Quote3D add-to-cart event
  → WooCommerce plugin/custom endpoint creates cart item
  → Quote metadata is stored as line item meta
  → Checkout shows calculated price
Shopify
Shopify can require a different strategy because checkout pricing is more restricted. The widget documentation notes Liquid-based App Block support and recommends closed-platform strategies such as a 1-unit product with quantity-based price mapping or price updates through the platform API.
Recommended Shopify flow:
Widget quote completed
  → Add-to-cart payload sent to backend
  → Backend stores quote ID and calculated price
  → Shopify line item includes Quote3D properties
  → App/backend applies price strategy using allowed Shopify mechanisms
Custom checkout
For custom software, store the quote as a normal priced item:
{
  "type": "custom_3d_print",
  "quoteId": "job_01HXYZ123456789",
  "fileName": "gearbox-housing.stl",
  "technology": "FDM",
  "material": "PLA",
  "quantity": 2,
  "price": 12.5,
  "currency": "USD",
  "thumbnailUrl": "https://...",
  "metadata": {
    "estimatedTime": "2h 15m",
    "filamentWeight": 42.8,
    "supportVolume": 3.2
  }
}
17. Common Integration Mistakes
Mistake 1: Expecting the quote endpoint to return the final price immediately
Quote generation is asynchronous. The first response gives you a job. Poll the job endpoint or use webhooks to get the completed result.
Mistake 2: Exposing your main backend API token
For direct API integrations, keep your API token on the server. For widget usage, create a dedicated token, rotate it, and do not confuse the actual token with a token ID.
Mistake 3: Ignoring widget resize events
If your iframe has a fixed height, parts of the widget may be cut off. Listen for QUOTE3D_RESIZE and update iframe height dynamically.
Mistake 4: Trusting webhook payloads without verification
Always verify the X-Webhook-Signature header with your webhook secret before updating orders, carts, or production systems.
Mistake 5: Dropping technical metadata during cart sync
Preserve fields such as quote ID, total price, currency, technology, material, quantity, file name, thumbnail URL, weight, and filament weight. This makes support, production, and reordering much easier.
Mistake 6: Hardcoding every printer and material parameter
Use dashboard profiles for defaults. Override only the fields that are different for a specific quote. This keeps your API requests easier to maintain.
18. Production Checklist
Before launching your Quote3D integration, verify the following:
API token is stored securely.
Widget token is dedicated and rotated regularly.
Dashboard printer profiles match real machines.
Material prices are configured correctly.
Default currency, tax, fixed fees, and energy cost are configured.
Widget embed works on desktop and mobile.
QUOTE3D_RESULTis handled.QUOTE3D_ADD_TO_CARTis handled.QUOTE3D_RESIZEis handled.Cart payload stores quote ID and technical metadata.
Webhooks are configured for production events.
Webhook signatures are verified using raw body.
Webhook handlers are idempotent.
Failed quotes are logged and shown clearly to users.
Rate limit and retry behavior is handled.
Test orders are completed end-to-end before launch.
19. Final Workflow Summary
A complete Quote3D integration looks like this:
Customer uploads STL, OBJ, or 3MF
  → Quote3D analyzes the model
  → Widget or API starts an async quote job
  → Your app receives the completed quote
  → Customer reviews price and technical details
  → Add-to-cart event sends quote data to your backend
  → Your store creates the cart item
  → Webhooks update CRM, ERP, production queue, or customer notifications
That is the real value of Quote3D: it turns 3D printing quotes from a manual back-and-forth process into an automated, measurable, and checkout-ready workflow.
Whether you start with the embeddable widget or build a fully custom API integration, the goal is the same: help customers move from uploaded model to accurate price to confirmed order with less friction and fewer manual steps.
FAQ
Does Quote3D support STL, OBJ, and 3MF files?
Yes. Quote3D documentation lists STL, 3MF, and OBJ as supported 3D model formats for upload and analysis.
Does Quote3D support FDM, SLA, and SLS?
Yes. Quote3D includes technology-specific logic for FDM, SLA, and SLS quote workflows.
Can I use the widget without building a full custom frontend?
Yes. The widget is designed as a no-code/low-code embeddable quoting solution and can be used on custom websites, WordPress, Shopify, WooCommerce, Wix, Squarespace, PrestaShop, OpenCart, and custom software.
Can I bypass the widget and use the API directly?
Yes. Use direct API integration when you want full UI control or backend automation. The core flow is file upload, optional printability check, async quote creation, job polling or webhook handling, and quote result storage.
Why does the quote endpoint return a job instead of a price?
Quote generation is asynchronous. The quote endpoint starts a processing job, and your application retrieves the result by polling the job endpoint or listening for webhooks.
How should I handle Shopify or other closed checkout platforms?
Use the widget payload to send the calculated quote and technical details to your backend, then apply the platform’s supported pricing strategy. The Quote3D widget documentation mentions strategies such as a 1-unit product with quantity-based price mapping or price updates through the platform API.
Are webhooks required?
No, but they are strongly recommended for production. Polling works for development and simple flows, while webhooks are better for real-time automation, order updates, CRM sync, and production workflows.